So today we are going to have the final installment of the Eye Make Up 101 piece, and it is the video of me actually doing the tutorial.
Some of the things that I have written about here will make a lot more sense when you watch it being done. How I hold and angle the brushes, how to use them etc.
I have to warn you though, there was a lot of crazy hilarity in the studio that day, and we had to keep doing re-takes because one of us would just bust up laughing! Even I couldn't keep a straight face at the end!
You'll hear Lea singing too, so enjoy!
Have a gorgeous weekend!
xo
C

Friday, July 31, 2009
Thursday, July 30, 2009
Lash 'em Danno!!!
I promised a little lash-o-rama tutorial, so I had Kelly Cappelli shoot some frames while we were getting Lea's makeup done the other day.
Lashes are the final step in your makeup. Make sure your eye makeup is complete and you have a couple of good coats of mascara on before you start lashes.
(If you need to curl your lashes do so before you put on your mascara. Be careful that you dont have the lashes too curled - they can make it very difficult to position the false lash.

You've all seen the big, crazy lashes that I use on fashion shoots and music videos, but for regular wear I use Ardell or Andrea lashes. (I have Shu Uemura for special occasions)
You want to practice this a couple of times before you launch into them on a big night out.
Lift the lash off the tray and position it along your eyelid to see where you want it placed once the glue is on.

I use Duo Medical Adhesive for my lash glue. Its kind to the delicate skin at the lash line, and feels safer to use around the eyes.
Get a white glue that dries clear. This is important, because its hard to tell if a black glue or a clear glue are all the way dry.
Bring up bubble of glue to the top of the applicator, and run your lash thru the bubble. (This will give you more control over the glue than trying to paint it along the lash)
Make sure you have extra on the outer corners.

Sit the lash along the base of the lashes. I like to bring them up a little at the outer corner so that the eyes don't appear to be drooping downwards.
Once I have the lash positioned on the lash line I press into it a little with the back end of a liner brush to help it stay smooth.
Now you just have to wait for the glue to dry. Sit down somewhere with your eyes closed for a few minutes. If your eyes are blinking and batting around, the false lash has a more difficult time adhering properly.
Ta dah! Perfect lashes!
If you dont have them quite close enough to your own lashes, run a little mascara through them to bind them together.

So this was our final look that day. Pretty fab, isn't it?

If you missed yesterday's blog (Eye Makeup 1 oooh!1) I did a tutorial on how to do the eye makeup for this look.
Maybe tomorrow I'll post the video of this tutorial.
So now you're armed and ready to knock 'em dead this weekend! Watch out boys!!!
xo
C
Wednesday, July 29, 2009
A Little Eye Makeup 1 oooh! 1....
Kelly and I came up with this brilliant idea that we could do some makeup tutorials with still shots rather than video.
You get to decide which you like better, because we have a video of this makeup too.
So anyway, welcome to Eye Makeup 1 ooh!1!
We were shooting Lea in a Fellini-esque look. The hair was high and loose, a hybrid of a Bardot look. The eyes were simple, but well defined. Easy to duplicate, easy to wear. You'll feel fabulous in this one
Start by concealing, and applying foundation and powder. Groom your brows too.
With a nice clean canvas we go to the next step.

Use an eyeshadow primer to help shadows adhere, and keep the colors true.

I just press it on with my finger.
Next up, use an oval shadow brush, and Nars Nepal shadow.

Sweep the shadow from the lash line to the brow. You can give it a couple of coats so that you can see the color nicely.

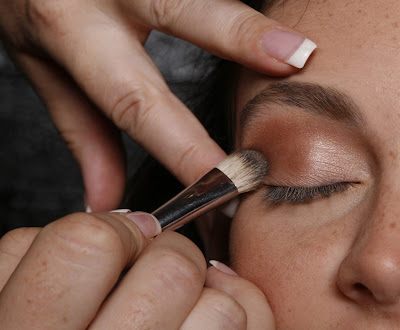
Now take an angle blender brush and Nars shadow in Barbuda.
Press the longer end of the brush into your crease, and move side to side across your crease. The shorter end of the brush is now creating a new crease for you, perfect for your eye shape.

Turn the angle blender brush onto its flat side, and press color into the outer corner of your eye for a little depth and drama.

Whichever shadow you are using, particles will drop below the eye.

To stop them staining the under eye area and making it look dirty or bruised, take a deluxe fan brush and sweep away anything that has dropped.
Now take a bent liner brush and some black cream liner.

The shape of the bent liner makes it easy to get a nice tight line along the base of the lashes.
Make sure you lift it out and up at the outer corner. If you follow your lash line all the way it will make you eyes look like they are angling downwards.

Use a taklon liner and some more Barbuda to smudge under the lower lashline. Keep the color right up into the lashline.

This gives you definition and a smokey effect without making your undereye look heavy.

A few coats of mascara and a set of false lashes, and we are good to go!

Isn't it pretty?
The products I used were:
Eye Shadow Primer
Nars shadow in Nepal
Nars shadow in Barbuda
Black cream liner
Mascara
False lashes
Brushes (from the CorinnaB line)
Oval Shadow Brush
Angle Blender
Deluxe Fan brush
Bent liner
Taklon liner
all brushes available at www.CorinnaB.com
Tomorrow we'll cover lash application, in time for the weekend!
I'll also post some more pics of the final look.
Soooo fab!!!
The facebookers and the twitterati are sending me messages re what makeup tricks they'd like to learn. You can either comment at the bottom of this blogpost, or click to follow me on twitter and leave me messages there. I want to know what you would like to see!
xo
C
Tuesday, July 28, 2009
Hey There Juicy Girl!
My gorgeous, funny, super glamorous friend from Texas blew into town this past week with a bunch of gorgeous, funny, super glamorous Texan friends, and we got to have such a fabulous, girlie time together! (as usual...!)
Whenever she's here I stay the night at her house.
Quite apart from the joys of a slumber party, the loud music we play, all of us putting our makeup on, doing our hair and getting glam to go out, the floating around in the pool with cocktails telling crazy stories, the divine sisterhood and camaraderie that is part and parcel of a Texan visit, there is the breathtaking excitement of wondering what goodies will be in the guest bathrooms.
She never lets us down! Not ever! This visit was all about Juicy. In my shower, lying in wait was the completely delicious Viva La Juicy Shower Gel. My absolute new favorite!

This gel is so softly fragrant that all day long, every time I moved I could smell it. Oooh I love it! It is truly divine. And I now have to go buy some!
While I'm doing so I may also pick up the Viva La Juicy Fragrance, although I didn't feel the need to layer it. I think that either the shower gel or the fragrance will be just beautiful standing alone.

And lets face it - when life lets you make the choice, you might as well be a juicy girl!
xoxo
C
Monday, July 27, 2009
Summer Makeup 101
I have had tons of people asking me via this blog, facebook, twitter etc for some makeup tutorials. So we decided that we would film some when we were on real shoots, so you could see the makeup happening and see a little bit of the behind the scenes action too.
Keeping it real.
The day we shot this segment was pretty wild! We did it at Studio5 (my home away from home). It was 115 degrees out, which is somewhat miserable, and about 20 minutes after we all arrived the power grid went down in that part of Scottsdale for almost 2 hours! Consequently our climate controlled studio turned into an oven! It never was able to quite cool down again that day. So as you watch this video, know that we all had sweat rolling down our backs, our gorgeous hairdos got wild with the humidity, and we ended up having to shoot way deep into the night...
The edits couldn't be completed on time, so you are seeing a semi rough cut. We actually had so much information in there that we ended up splitting it into 6 segments.
The first tutorial I wanted to give you was on summer makeup. Here we are, smack bang in the middle of summer, so there's no time like the present!
I was able to include segments that show you how to use some of the JulieHewett products that I've written about too, so that you can really take advantage of the summer discount that the company has extended to my readers. (and because thats what I've actually been using...)
Summer makeup needs to be soft and fresh and a little shimmery. You definitely don't want to be overwhelming the face with heavy makeup.

This is a picture from the photoshoot itself, shot by the amazing Kelly Cappelli
Our model, Mallory, was a doll, so inspite of the heat we all had a blast!

Last look at the Zoe eyes and cheeks.
Don't forget to go to Julie Hewett's website click here and at the checkout enter the code SUM20.
You will get 20% off anything and everything you order. You can order as much or as little as you want. Make sure you read her bio too - its fabulous!
Have a beautiful day!
xoxo
Friday, July 24, 2009
Here Comes The Weekend...
So one of my absolute favorite blogs is the Racing Fashionistas. These girls have it down! They are all about fashion, fun and racing - three of my most favorite things in life. They mostly seem to write about Nascar, which I know very little about, but am learning all kinds of fun info from their blog.
If I lived in the same town as these three, I would want to be their BFF - they are just so cool!
Anyway, on Fridays they do a Happy Hour post, and each week they feature a different drink. Its pretty cool to see what they come up with each week.
I am not much of a drinker, even though I am a Kiwi. However, here and there I do stumble upon aperatifs that look fab, or maybe I've been out and imbibed something that is fab, so from time to time I will shamelessly rip off the Fashionistas and give you a new cocktail to make or to order. And it will probably end up being in a Friday post too.
This weekend in Phoenix we have ridiculously searing heat that just defies all belief, so I will be cooling off and enjoying the final outing of the Western Swing (via ESPN), with a big, cold Lavender Lemonade in my hand.
So here's the recipe:
Lavender Lemonade

You will need:
1 cup sugar (divided)
4 tsp dried lavender (divided)
2 lemon wedges
12 oz vodka (I use Grey Goose)
3 oz lemon juice
Combine 1/2 cup sugar, 1/2 cup water and 2 tsp lavender in a small saucepan. Boil til sugar is dissolved (only a couple of minutes). Cool down and strain syrup, removing the lavender.
Grind remaining sugar and lavender in a spice grinder until fine. Moisten the rims of your glasses with the lemon wedges and coat lightly with the mixture (like salting a margarita glass).
Fill a pitcher 2/3 with ice. Pour in vodka, cooled sugar syrup, and lemon juice.
Stir to mix, strain and pour.
Then kick back and see who wins funnycar, with a nice cold Lavender Lemonade in hand...
xo
C
Oh and by the way, thanks for all the comments on the Sonoma*A*Go Go blog! It is so much fun reading about who you want to win. Some of you are just plain hilarious!!!
The race isn't over til Sunday, so keep 'em coming!
Wednesday, July 22, 2009
Shu Racing!
Actually, this post has nothing what so ever to do with racing, but a whole lot to do with lashes and cleansing oils.
This morning after doing a segment on breakfast TV, I mosied on down to Saks 5th Avenue where I had one of my hyperventilative whirls through Shu Uemura to pick up more cleansing oil and check out the lash bar. A couple of treasures that you need full knowledge of!
Firstly, Shu itself. This is a truly delicious line of makeup designed by one of old(ish) Hollywood's most celebrated Makeup Artists. It's one of those lines that has spectacular makeup & divine skin care (the two don't often get together within one line). Add the most sensational lashes to the mix and I become hopelessly, devotedly addicted.

Uemura-san
So first up, lets talk about the cleansers. I love these passionately! Shu has a line of cleansing oils that will make you a convert as soon as you try them. The line is quite extensive and has different oils for all the different skin types. I know some of you are squirming at the concept of using oil on your face, and some of you may even have had not quite fabulous experiences with other brands, but trust me here!
You just massage a small amount of the oil into your dry skin, or fully made up face, then emulsify it with a little lukewarm water. It dissolves all makeup, even waterproof. It cleanses your skin so beautifully, and then leaves it soft and supple.
There is an oily skin formulation (oil lifts away oil), there's a skin brightening one, I use either the balancing or the purifying. The green purifying oil is anti aging, has antioxidants, cleanses, protects, and is the #1 selling oil cleanser in the world.


You can get the cleansing oils at the Shu Uemura Boutiques, at Saks 5th Avenue and at Sephora. (check website for other locations)
Next up, the Lash Bar.
The boutiques and Saks (probably some Niemans and other places too) also have a wall of the world's most fabulicious lashes, made by Shu.
There are simple lashes of all shapes and sizes, as well as the more extravagant lashes.
The basic lashes tend to run around $25 per set.

The combination of great quality and sensational design make Shu lashes sought after world wide.
They even designed special jewelled lashes for Madonna to use in her videos and on her tours. You can actually purchase almost the same lashes that Miss M uses, but with crystals and rhinestones instead of actual jewels, so they are a tad more cost effective.

And you have to figure on some level, if they are good enough for her, they can be just fab for us too!!!
I buy a lot of my more extreme lashes from Shu Uemura also. In fact, I have bags of them! (it's kinda like the shoe thing...) The big feather lashes etc I use on fashion shoots, not for a night on the town or a day at the races. But that's just me getting all conservative on you. If I saw you out at dinner in a pair of big fluffy orange Shu lashes, I would respect you. Immensely!
The lashes below were designed for Shu by Viktor and Rolf, and when I checked were $95 per pair. I don't own them. Yet. But I so covet the bottom pair!

One of the things that sets the lash bar apart from other lash bars, is that they have samples of almost all of their lashes inside glass cubes that you can hold up to your eye and look in the mirror to see how they really will look on you.
I can play there for hours, but it invariably costs me...
So today was all about the cleansing oil, and I didn't add to the ever growing lash collection.
I do recommend trying the cleansing oils. I have never had anyone who has tried them not totally love them.
And love makes the world go round...
xo
C