Thursday, August 6, 2009

These Lips Were Made For Kissin'!

Fabulous, kissable lips are the order of the day!

Throughout the warm (hot!) summer months you just can't beat a soft luscious lip gloss to keep you looking fresh and gorgeous.
You also can't beat a 20% discount on the luscious lip glosses!

Julie Hewett has beautiful new lip lush lip glosses about to arrive, and I want you to be the first to know about them.


Sophia, Bardot and Mimi are about to arrive, and Harlow is already here.

Then, of course, there's Chloe, the lip lush I've been talking about and wearing all summer long!


Love, love, love it!!!


To get the discount, (one any and all of her products) go to Julie's website www.JulieHewett.net
At the checkout enter the promotional code SUM20
This will get you, and all those you love, the full 20% discount as well as $4.95 on domestic shipping


Wednesday, August 5, 2009

Wedding Day Survival Kit

Summer is primo wedding season for pretty much everywhere (except Arizona!)
I am constantly getting asked about what items a gal should pack to keep the beauty going strong after the makeup artist has left, so I figure there's no time like the present to tackle this one!
It should be noted too, that this is ideal for any night out, and these items are standard in whichever handbag I'm trotting around town with.

If you are getting married, I highly recommend having a makeup artist get you ready. If you have a pro take care of your makeup, you will need very little in the way of touch ups.
I also emphatically recommend you get someone who uses airbrush. No ifs, buts or maybes.

But back to the kit...

1) Blotting papers.
You want to combat any shine that comes up with blotting papers. Sephora brand are great, MAC has good ones too. Don't ever wipe, just press onto the area and lift. This will help lift away any oiliness. If you keep adding powder your face will start to look overly made up and cakey.


2) Makeup Forever Duo Mat.
This is one of those powder/foundation combos, and in my opinion (and I always have one!) it is by far the best. Sometimes you need a little extra powder, and by using a dual product you are replacing any color that has wiped away.
Duo Mat has the best colors, a gorgeous natural finish to it, keeps you nicely matte. The packaging is very slimline and wont be bulky in your makeup bag. Put a triangle sponge in there too (get your makeup artist to give you one if you dont have them). If you get weepy, or need a repair job under the eyes etc, a slim pointed triangle sponge is key.


3) Lip liner.
You will need to be touching up your lips throughout the day. I love MAC lip liners and Julie Hewett lip liners. Your makeup artist can tell you which color you need so that you can buy it prior to the big day.


4) Lip Gloss
I love putting my brides in colored lip glosses, and there are some fabulous ones out there. Make sure you are using one that is not tacky or gooey (never a good look). I love MAC, Julie Hewett and Chanel for glosses. They have the best colors, last nicely, and dont ball up on the lip.
Definitely get a gloss that is on a wand. The application is so much easier, and there is less chance of you spilling it on your dress.


5) Plackers
There is nothing worse that talking to people with food stuck between your teeth!
After eating, a quick trip to the ladies room with a placker and you can make sure the teeth are looking beautiful! (most of us dont have the time or the space to be brushing out teeth all the time while we're out. And toothpaste really jacks with the taste of champagne...)


6) Listerine Breath Strips
Assume you have bad breath, and keep these on hand!
(Its a way better plan than assuming you dont!) Most brides get a pretty dry mouth on their wedding day. These will keep you fresh.
Absolutely do not chew gum, and breath mints will end up giving you icky breath anyway. Plus you can end up with little white flecks of altoid on your lips.


7) Neatly folded Kleenex.
Pre-fold a few kleenex and keep them flat in your bag. If you get weepy, slip a flat, folded kleenex under the lower lashes and press. Never, never wipe or use a bunched up kleenex. Chances are you'll just make a big old mess.

8) Eyedrops
For the brave only! These are in emergency only! If you've been crying, or have a fleck of something in your eye, slip a folded kleenex under your lower lashes, tip your head back and as you look away, drop one drop into the inner corner of your eye.
Close your eye, and keep it closed for a few seconds. You dont want tears rolling down your beautifully made up face!


9) Bobby pins for any mini hair repairs. You wont need many, but its a good idea to have them on hand.

10) Safety Pins
I keep a couple of small ones and a couple of medium/big ones. You never know when there's going to be an accidental rip, or a quick fix is needed. Better safe than sorry!

A quick last look in the mirror, and girlfriend, you are good to go!

xo

C

Tuesday, August 4, 2009

Brush Me Baby!


So I wanted to answer some of the questions you've been sending me about the CorinnaB brush line, and rather than do endless replies, I figured I'd just put it all here.

I decided back in the mid nineties that I wanted to do a makeup brush line. I also decided that anything I would put my name on had to be of extraordinary quality, so I set in motion a program that took years to complete.

I would get a given set of brushes, and then put it through its paces for months on end, both with my personal at-home use, and also being integrated into my kit. I kept finding that most brushes were OK for a couple of months, but past that point they would start breaking down, losing too many hairs, losing shape and texture, and ultimately they would wind up in the "no way Jose" pile.

Then there would be the brushes that held up OK in terms of not falling apart, but didn't pick up and transport product efficiently. I wanted something that would really smoothly glide product across the skin.
I was able to eliminate different hairs - I didn't want squirrel, I didn't want pony etc, but it took a great deal of time to find something that I really did want.
I eventually came across badger brushes. The hair met the quality standards I had set, and my little love affair began...

But finding the right hair for your brushes is just the very beginning. Next up you have to decide on the specific shapes you want for your brushes, based on what tasks you want them to perform. After that the density of the hair comes into play. A brush that is too densely packed will create a stripe across this skin, a brush that doesn't have sufficient hairs bound into the ferrule will splay out across the skin and leave you with no control of the product placement.


With badger hair there are four shavings per year, and each shaving yields a different type of hair. The mid-winter shave is the softest hair, the summer shave is the most course hair.
After I had fallen in and out of that equation a few times, I got the perfect brushes.

So long story short, it took forever and a day to get it exactly as I wanted it, then 12 months of really working the brushes hard, and seeing how they held up before I was ready to put my name on them and introduce them to the world.

They've been around for a couple of years now, and I am still using my original sets everyday.
Oh, and by the way, these brushes are manufactured right here in America!

You can read about the individual brushes on the website CorinnaB.com

I'll periodically talk about an individual brush here on the blog, and I show you the brushes at work in the youtube videos.

I hope this answers the bulk of your questions, but always feel free to ask me more!


Have a gorgeous day

xo

C

Monday, August 3, 2009

Meet the Crew

I keep talking to you about the people I work with, but haven't really introduced you yet.

I love that my career takes me to many different and exciting places, and I love that I am always doing something new and thrilling, but best of all I love the creative teams that in this line of work you wind up on.
When you are really lucky, and all the planets line up just right, you find yourself working as part of a super creative team of like minded souls. And when you get the right fit, you end up working over and over and over together.

So here is the absolute gorgeousness that is Will Zecco.


Will is the hair genius. Handsome buggar, isn't he? We have worked together as the hair and makeup team for almost 7 years. Not all, but by far most clients book us together. And it is always, always great fun!
Will makes me laugh til I cry.
He also knows all the right things to say to a girl. You can be having one of those days where you look like hell in a handbasket, and Will will make you feel beautiful. And then he will round out your day with the raunchiest jokes you have ever heard in your life!
Everywhere we go people think we're married, and I let them keep thinking it! (even though we actually bat on different teams...)
Life is definitely a lot more fun when Will is around.

Next up, meet Kelly Cappelli.


Kelly is the most amazing photographer ever!
She is from the Chicago area, and has a huge background in fashion. She has an unparalleled ability to paint stories with light and texture. I spend a lot of time standing behind her watching her shoot, and am always just bowled over by the images she comes up with. I am always wondering "how didn't I see that?"
Our clients have the added benefit that she does a huge amount of very high profile image enhancement work. Very famous people - actors, rockstars, professional speakers, athletes etc come to Studio5 to Kelly to change their look or their public image. Its pretty wild. (I would name-drop like crazy at this point, but its always confidential. Its cool though - trust me on this one!)
She can take an average person and guide them in how to move their body, and tell stories with their eyes, and get the absolute best out of them!
And quite apart from being a genius, she has also become one of my very closest friends.

And this gorgeous young thing is Lea. We shoot with Lea an enormous amount. You've seen her picture on my blog before, and you will be seeing a whole lot more of her too.
Lea is a brilliant model - just amazing to work with! She is also a recording artist with huge things happening in the music biz. She will become a household name, no question about it, and you will be able to say "I knew her way back when..."


Here we are after one of my video makeup tutorials. That was a really hilarious day. We all got the giggles really badly, and wound up having to do about a million takes. In fact we wound up having to use a take with us bursting out laughing at the end!


Lea can be doing a really physically demanding, intense shoot, but she still breaks into song every few minutes. To hear her sing click here.

So now you know the crew.
If you see one of us in an airport, keep looking, because the rest wont be too far away! We are always all over the map.(you'll know which one is me, I'll be the one in the high heels...)

Hope you're having a gorgeous day!

xo

C

Friday, July 31, 2009

Fellini shoot, Studio 5

So today we are going to have the final installment of the Eye Make Up 101 piece, and it is the video of me actually doing the tutorial.

Some of the things that I have written about here will make a lot more sense when you watch it being done. How I hold and angle the brushes, how to use them etc.

I have to warn you though, there was a lot of crazy hilarity in the studio that day, and we had to keep doing re-takes because one of us would just bust up laughing! Even I couldn't keep a straight face at the end!

You'll hear Lea singing too, so enjoy!


Have a gorgeous weekend!

xo

C

Thursday, July 30, 2009

Lash 'em Danno!!!

I promised a little lash-o-rama tutorial, so I had Kelly Cappelli shoot some frames while we were getting Lea's makeup done the other day.

Lashes are the final step in your makeup. Make sure your eye makeup is complete and you have a couple of good coats of mascara on before you start lashes.
(If you need to curl your lashes do so before you put on your mascara. Be careful that you dont have the lashes too curled - they can make it very difficult to position the false lash.


You've all seen the big, crazy lashes that I use on fashion shoots and music videos, but for regular wear I use Ardell or Andrea lashes. (I have Shu Uemura for special occasions)
You want to practice this a couple of times before you launch into them on a big night out.

Lift the lash off the tray and position it along your eyelid to see where you want it placed once the glue is on.


I use Duo Medical Adhesive for my lash glue. Its kind to the delicate skin at the lash line, and feels safer to use around the eyes.
Get a white glue that dries clear. This is important, because its hard to tell if a black glue or a clear glue are all the way dry.

Bring up bubble of glue to the top of the applicator, and run your lash thru the bubble. (This will give you more control over the glue than trying to paint it along the lash)
Make sure you have extra on the outer corners.


Sit the lash along the base of the lashes. I like to bring them up a little at the outer corner so that the eyes don't appear to be drooping downwards.
Once I have the lash positioned on the lash line I press into it a little with the back end of a liner brush to help it stay smooth.

Now you just have to wait for the glue to dry. Sit down somewhere with your eyes closed for a few minutes. If your eyes are blinking and batting around, the false lash has a more difficult time adhering properly.

Ta dah! Perfect lashes!
If you dont have them quite close enough to your own lashes, run a little mascara through them to bind them together.


So this was our final look that day. Pretty fab, isn't it?


If you missed yesterday's blog (Eye Makeup 1 oooh!1) I did a tutorial on how to do the eye makeup for this look.

Maybe tomorrow I'll post the video of this tutorial.

So now you're armed and ready to knock 'em dead this weekend! Watch out boys!!!

xo

C

Wednesday, July 29, 2009

A Little Eye Makeup 1 oooh! 1....

Kelly and I came up with this brilliant idea that we could do some makeup tutorials with still shots rather than video.
You get to decide which you like better, because we have a video of this makeup too.

So anyway, welcome to Eye Makeup 1 ooh!1!

We were shooting Lea in a Fellini-esque look. The hair was high and loose, a hybrid of a Bardot look. The eyes were simple, but well defined. Easy to duplicate, easy to wear. You'll feel fabulous in this one

Start by concealing, and applying foundation and powder. Groom your brows too.
With a nice clean canvas we go to the next step.


Use an eyeshadow primer to help shadows adhere, and keep the colors true.


I just press it on with my finger.

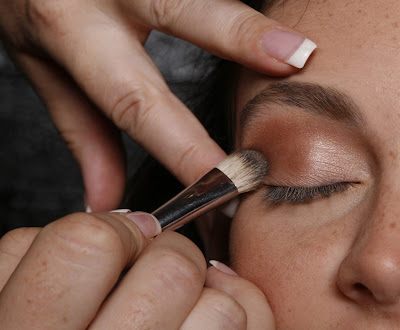
Next up, use an oval shadow brush, and Nars Nepal shadow.


Sweep the shadow from the lash line to the brow. You can give it a couple of coats so that you can see the color nicely.


Now take an angle blender brush and Nars shadow in Barbuda.
Press the longer end of the brush into your crease, and move side to side across your crease. The shorter end of the brush is now creating a new crease for you, perfect for your eye shape.


Turn the angle blender brush onto its flat side, and press color into the outer corner of your eye for a little depth and drama.


Whichever shadow you are using, particles will drop below the eye.


To stop them staining the under eye area and making it look dirty or bruised, take a deluxe fan brush and sweep away anything that has dropped.

Now take a bent liner brush and some black cream liner.


The shape of the bent liner makes it easy to get a nice tight line along the base of the lashes.
Make sure you lift it out and up at the outer corner. If you follow your lash line all the way it will make you eyes look like they are angling downwards.


Use a taklon liner and some more Barbuda to smudge under the lower lashline. Keep the color right up into the lashline.


This gives you definition and a smokey effect without making your undereye look heavy.


A few coats of mascara and a set of false lashes, and we are good to go!


Isn't it pretty?

The products I used were:
Eye Shadow Primer
Nars shadow in Nepal
Nars shadow in Barbuda
Black cream liner
Mascara
False lashes

Brushes (from the CorinnaB line)
Oval Shadow Brush
Angle Blender
Deluxe Fan brush
Bent liner
Taklon liner
all brushes available at www.CorinnaB.com

Tomorrow we'll cover lash application, in time for the weekend!
I'll also post some more pics of the final look.
Soooo fab!!!

The facebookers and the twitterati are sending me messages re what makeup tricks they'd like to learn. You can either comment at the bottom of this blogpost, or click to follow me on twitter and leave me messages there. I want to know what you would like to see!

xo

C